Hi there! ( ˙꒳˙ )ノ
This is my 2nd study note on Linux forensics. For details, please see the contents below. It was a great starting point for me to learn about Linux forensics!
Hal Pomeranz Linux Forensics Intro
Table of Contents
Finding evil by volatility
Linux rootkits
- Linux rootkits can leverage (= use) Loadable Kernel Modules (LKM)
Loadable Kernel Module (LKM)
- A piece of code that can be loaded into the kernel at runtime to extend its functionality—such as adding drivers or system calls—without rebooting or recompiling the kernel.
- Malicious actors can abuse LKMs to hide processes, files, or network activity by hooking or modifying kernel behavior.
- Volatility can help locate (= identify) them!
Spot malicious modules
You can identify it using the Volatility plugin
linux.check_modules.Check_modules, as shown below.$ vol3.py -s . -f memory.lime linux.check_modules.Check_modules Module Address Module Name 0xffffc0e1a0c0 diamorphine # <-- Evil Module 0xffffc0b88b40 vmw_vsock_virtio_transport_commo # <-- False positive
Spot the missing syscalls
Once the malicious kernel module is loaded, it needs to intercept legitimate system calls– a process typically referred to as hooking
You can identify it using the Volatility plugin
linux.check_syscall.Check_syscall, as shown below.# Extracts system call names from a suspicious (possibly rootkit-infected) memory image $ vol3.py -s . -f memory-rootkit.lime linux.check_syscall.Check_syscall | awk '{print $5}' >syscalls-rootkit # Does the same for a clean memory image $ **vol3.py -s . -f memory-clean.lime linux.check_syscall.Check_syscall | awk '{print $5}' >syscalls-clean # Compares both files and shows system calls that appear in only one of them $ sort syscalls-* | uniq -u __x64_sys_getdents __x64_sys_getdents64 __x64_sys_killSuspicious missing syscall hooks like
__x64_sys_getdents,getdents64, andkill, which are often targeted by rootkits to hide files or processes.__x64_sys_getdentsand__x64_sys_getdents64: These retrieve directory entries. Rootkits often hook them to hide files or directories (e.g., malicious binaries) from directory listings.__x64_sys_kill: This sends signals to processes. Malicious actors may hook it to prevent termination of their processes or to implement covert communication channels.
Pivoting tips
YaraScanleverages your existing IoCs- Could also run Yara independent of Volatility
- Use
Bashplugin to check command history saved in.bash_history- Sometimes adversary isn’t careful
- Don’t forget
bulk_extractorandstrings- Low tech but effective*
Other modules
| Plugin | Objective |
|---|---|
linux.check_afinfo.Check_afinfo | Manipulating network structs to hide |
linux.tty_check.tty_check | Look for a particular keylogging method |
linux.keyboard_notifiers.Keyboard_notifiers | Another keylogging method |
linux.check_creds.Check_creds | Looks for process credential stealing |
Disk acquisition & access
Disk acquisition scenarios
- Public Cloud: Follow vendor procedures
- Private Cloud: Snapshot and copy (
qemu-imgto translate) - Local Device:
ewfacquire,dc3dd
Difficult disk geometrics
- Linux forensic tools work best with raw disk images:
- 👍 bit-for-bit copies of storage media with no compression or metadata
- 🙅 E01 (EnCase), AFF, or VMDK (VMware disk)
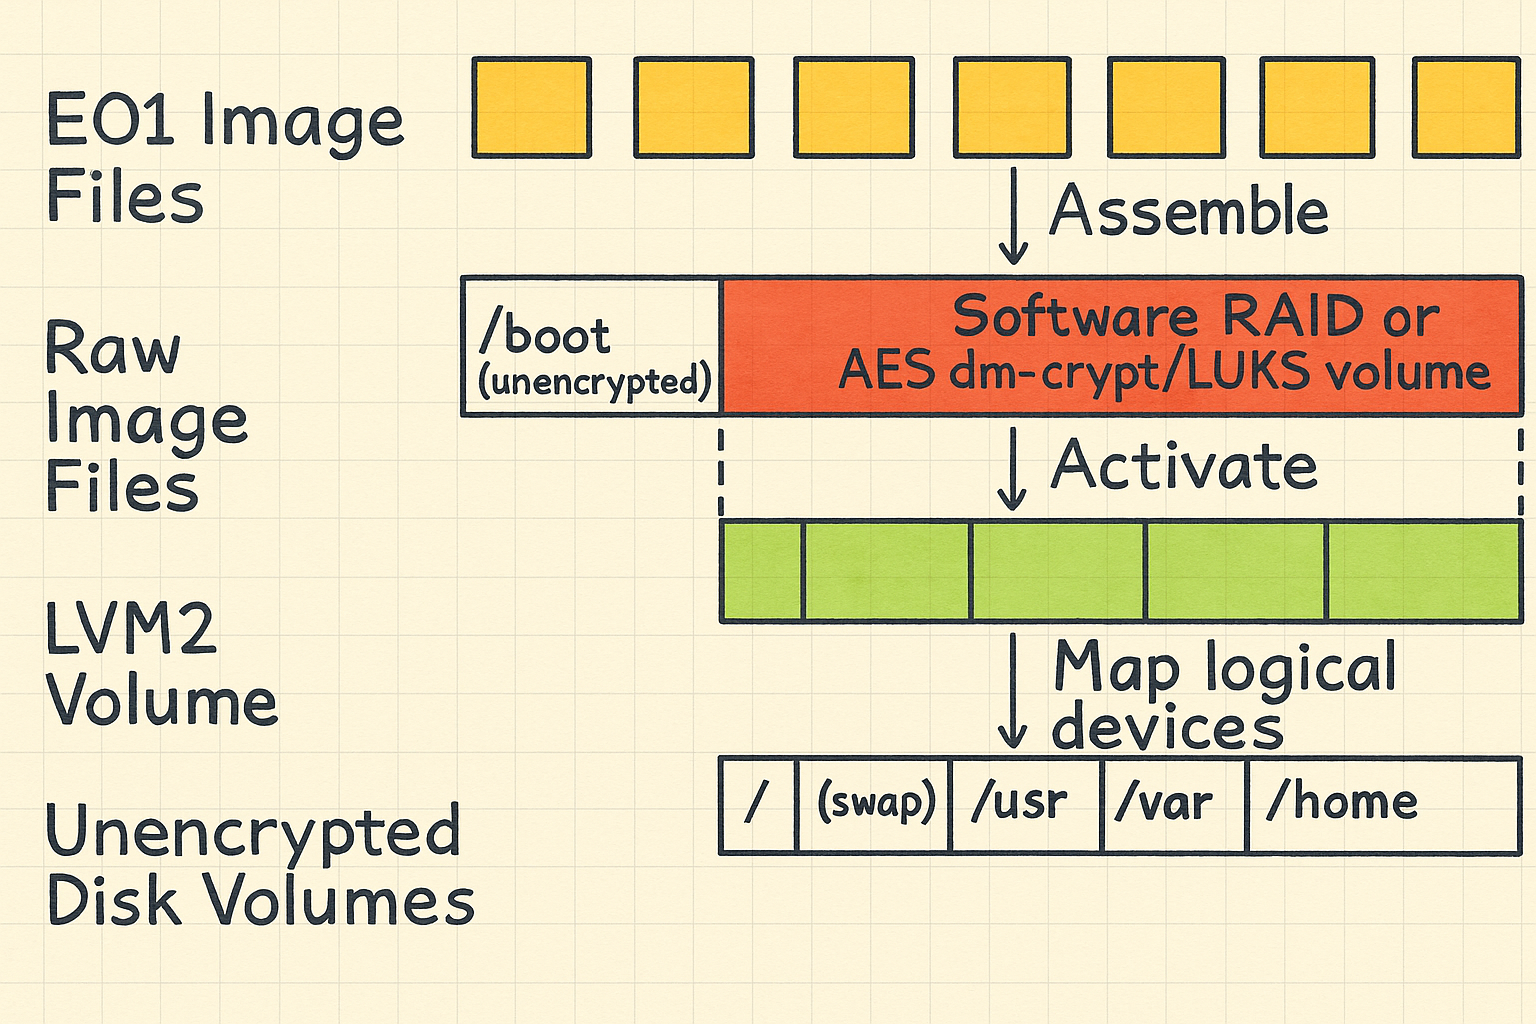
- Multiple abstraction layers are used in Linux-specific storage setups:
- Encrypted volumes: e.g., LUKS or dm-crypt — tools need the decryption key and correct mapping.
- Software RAID: Linux can assemble multiple physical disks into a logical RAID array, which must be reassembled correctly to interpret data.
- Logical Volume Management (LVM): Span multiple physical partitions or disks, requiring proper volume group activation.
- File systems often “dirty” (underplayed)
- Metadata or file contents may be incomplete — making analysis harder.
Layers of complication
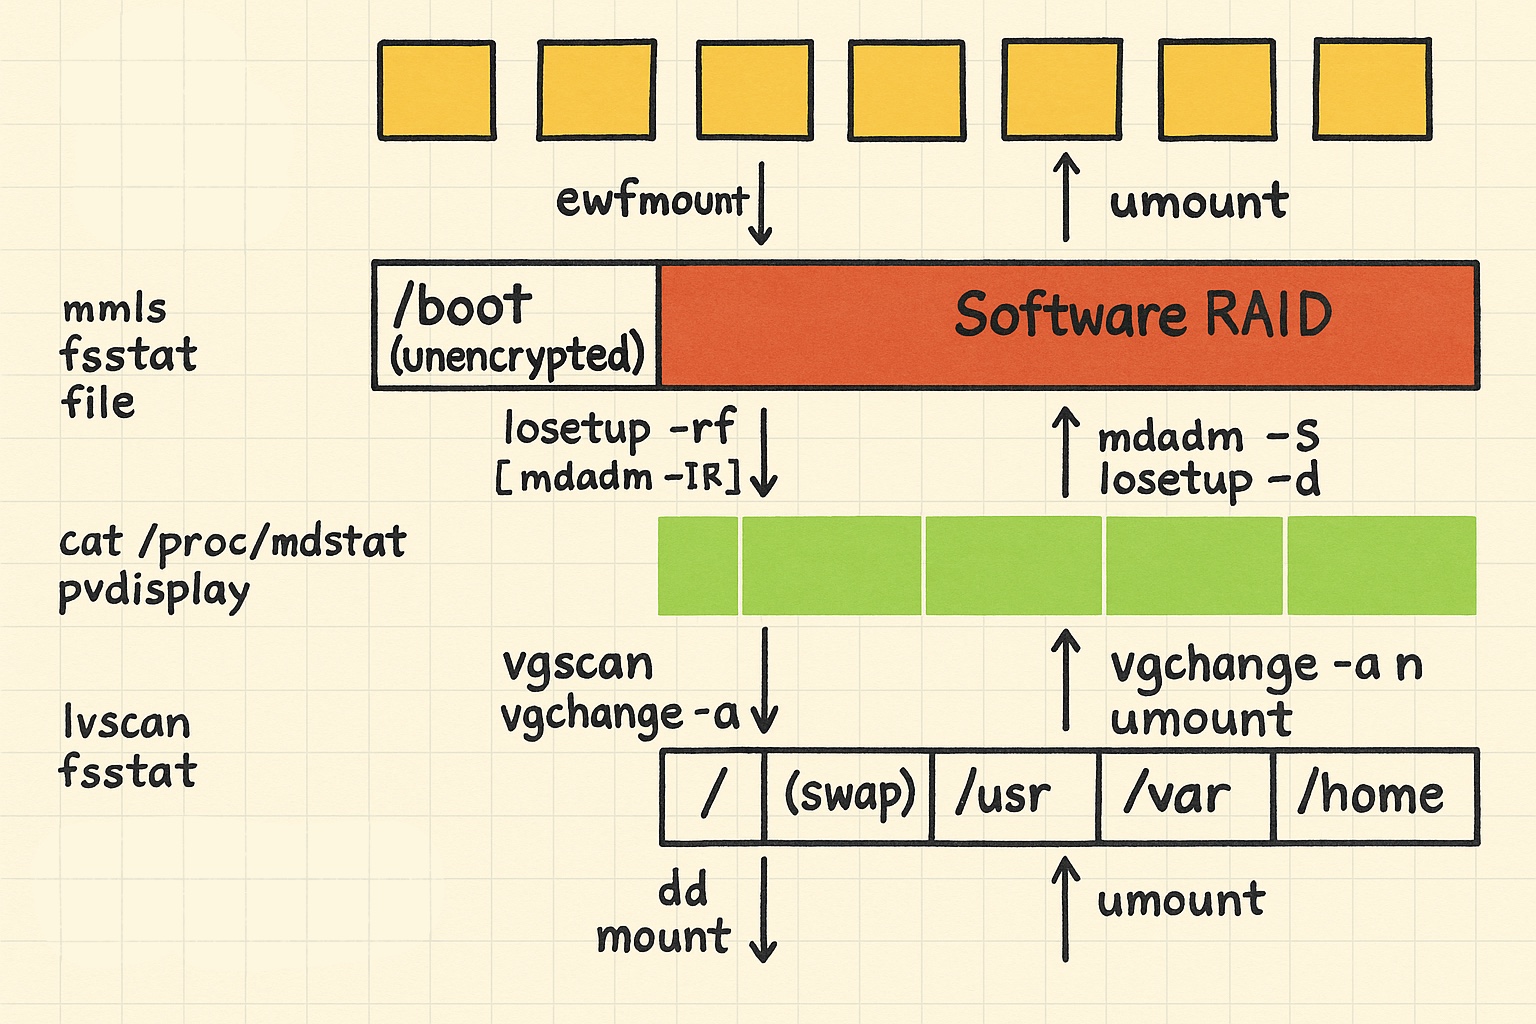
Commands for analyze disks
There is a multi-step process for analyzing disks:
- Mount the
.E01file- Identify the partition table
- Create a loopback device for the LVM partition
- Activate the Logical Volume Manager
- Mount the logical volume
Let’s go through each step one by one.
Mount the
.E01fileUse the
ewfmountcommand to create a virtual, read-only representation of the.E01image.This will present the compressed image as a single raw disk file.
$ ewfmount Webserver.E01 /mnt/test/img
ewfmount 20140608

$ ls -lh /mnt/test/img
total 0
-r--r--r-- 1 root root 32G Feb 16 18:21 ewf1
Expert Witness Format (EWF)
- Family of file formats used to store a forensic copy of a disk or other storage media.
Identify the Partition Table
Use the
mmlscommand to examine the partition layout of the raw disk image to find the LVM partition.$ mmls /mnt/test/img/ewf1 DOS Partition Table Offset Sector: 0 Units are in 512-byte sectors Slot Start End Length Description 00: Meta 0000000000 0000000000 0000000001 Primary Table (#0) 01: ----- 0000000000 0000002047 0000002048 Unallocated 02: 00:00 0000002048 0000499711 0000497664 Linux (0x83) 03: ----- 0000499712 0000501759 0000002048 Unallocated 04: Meta 0000501758 0066064383 0065562626 DOS Extended (0x05) 05: Meta 0000501758 0000501758 0000000001 Extended Table (#1) 06: 01:00 0000501760 0066064383 0065562624 Linux LVM (0x8e) 07: ----- 0066064384 0066064607 0000000224 UnallocatedUse the
fsstatcommand to understand the type of file system$ fsstat -o 2048 /mnt/test/img/ewf1 FILE SYSTEM INFORMATION -------------------------------------------- File System Type: Ext2 Volume Name: Volume ID: 1e860db5dd43e2934d499ba1013b8832 Last Written at: 2019-10-05 05:41:51 (EDT) Last Checked at: 2016-04-03 12:05:47 (EDT) Last Mounted at: 2019-10-05 05:41:51 (EDT) Unmounted Improperly # 👈 means the file system is dirty Last mounted on: /boot …
Create a loopback device for the LVM partition
Use the
losetupcommand to create a loopback device specifically for the LVM partition.Loopback device
- A virtual network interface that allows a computer to communicate with itself.
Using the start sector you identified in the previous step.
It will need to calculate the byte offset by multiplying the start sector by the sector size (usually 512 bytes).
$ losetup -rf -o $((501760*512)) /mnt/test/img/ewf1-o= Need byte offset (sector data frommmls)-r= Read only.-f= First available.
$ losetup -a
/dev/loop0: [0020]:2 (/mnt/test/img/ewf1), offset 256901120

$ file -s /dev/loop0
/dev/loop0: LVM2 PV (Linux Logical Volume Manager), UUID: SA3YAl-91Rk-W5FA-cQGz-TnXl-J4yN-awbQjd, size: 33568063488
Activate the Logical Volume Manager
We must activate LVM before mounting its contents.
LVM (Logical Volume Manager):
- Combines multiple physical storage devices (called Physical Volumes).
- Creates a single virtual disk area (a Volume Group) from them.
- Allows you to flexibly manage partitions (Logical Volumes) within that virtual disk space.
Use the
pvdisplaycommand to get detail about LVM physical volume
$ pvdisplay /dev/loop0
--- Physical volume ---
PV Name /dev/loop0
VG Name VulnOSv2-vg
PV Size 31.26 GiB / not usable 0
the volume group name is “VulnOSv2-vg”.
Use the
vgscancommand to scan disk and loopback devices for LVM metadata$ vgscan Reading all physical volumes. This may take a while... Found volume group "RD" using metadata type lvm2 Found volume group "VulnOSv2-vg" using metadata type lvm2Use the
vgchangecommand to activate an LVM volume group$ vgchange -a y VulnOSv2-vgthe
lvscancommand list and filter logical volumes that belong to the specific volume group.$ lvscan | grep VulnOSv2-vg ACTIVE '/dev/VulnOSv2-vg/root' [30.51 GiB] inherit ACTIVE '/dev/VulnOSv2-vg/swap_1' [768.00 MiB] inheritUse the
fsstatcommand to confirm the device nodes were set up properly$ fsstat /dev/VulnOSv2-vg/root FILE SYSTEM INFORMATION -------------------------------------------- File System Type: Ext4 Volume Name: Volume ID: 46c34db340bee5aa35423fd055183259 Last Written at: 2019-10-05 05:41:50 (EDT) Last Checked at: 2016-04-03 12:05:48 (EDT) Last Mounted at: 2019-10-05 05:41:50 (EDT) Unmounted properly Last mounted on: / …
Mount the logical volume
- Once the Volume Group is active, you can see the Logical Volumes (LVs) inside it as device files in
/dev/<volume_group_name>/ - Now we can mount the desired Logical Volume.
$ mount -o ro,noexec,noload /dev/VulnOSv2-vg/root /mnt/test/data $ ls /mnt/test/data bin dev home lib media opt root sbin sys usr boot etc initrd.img lost+found mnt proc run srv tmp var- Mount the
rootfile system on our target directory using the LVM device node name -noload= Tell the file system driver to ignore any incomplete transactions in the file system journal
$ mount -o ro,noexec,loop,offset=$((2048*512)) /mnt/test/img/ewf1 /mnt/test/data/boot $ ls /mnt/test/data/boot abi-3.13.0-24-generic memtest86+.bin config-3.13.0-24-generic memtest86+.elf grub memtest86+_multiboot.bin initrd.img-3.13.0-24-generic System.map-3.13.0-24-generic lost+found vmlinuz-3.13.0-24-generic- Mount the
/bootpartition directly.
- Once the Volume Group is active, you can see the Logical Volumes (LVs) inside it as device files in
Unmount
You can unmount a mounted logical volume using umount:
$ umount /mnt/test/data/boot
$ umount /mnt/test/data
After unmounting, confirm that the process is fully completed:
# Deactivate the LVM volume group
$ vgchange -a n VulnOSv2-vg
	0 logical volume(s) in volume group "VulnOSv2-vg" now active

# Delete the loopback device
$ losetup -d /dev/loop0

# Unmount the virtual ewf1 file created under the following path
$ umount /mnt/test/img
Commands by layer
“Quick hit” disk artifacts
Important directories
| Linux File/Path | Windows Equivalent | Description |
|---|---|---|
/home/$USER/ /root | C:\Users\USERNAME\ %USERPROFILE% | User profile directory |
/var/log | Windows Event Logs | Security logs, application logs, etc. Logs normally kept for about 4-5 weeks |
/var/log/auth.log | Windows Event Logs (Security.evtx) | Login attempts, authentication events |
/etc | %SystemRoot%/System32/config | Primary system configuration directory. Separate configuration files/dirs for each app. |
/etc/passwd | SAM (Security Account Manager) | Stores basic user account info (username, RID, group membership) |
/etc/shadow | SYSTEM + SAM + SECURITY hives (registry) | Stores user password hashes and account policies securely |
/etc/group | Local Group Policy / net localgroup | Group membership information |
/etc/systemd/system/ | HKLM\SYSTEM\CurrentControlSet\Services | System-level services that can be used for persistence |
/etc/rc.local (if used) | Startup folder + Run keys | Legacy script run at startup; similar to Startup folder or Run registry key |
crontab -e / /etc/cron* | Scheduled Tasks (schtasks) | Scheduled job execution (can be abused for persistence) |
~/.config/autostart/ | HKCU\Software\Microsoft\Windows\CurrentVersion\Run | User-level autostart entries (XDG-compliant apps) |
~/.bashrc, ~/.profile | Autoexec.bat / User logon scripts | Executed at shell or session start; often abused for stealthy persistence |
Basic system info
- Linux distro name/version number:
/etc/*-release- Or use:
ls *-release
- Or use:
- Computer name:
/etc/hostname- Also log entries under
/var/log
- Also log entries under
- IP address(es):
/etc/hosts(static assignments)/var/lib/NetworkManager(DHCP)/var/lib/dhclientor…/dhcp
- Installation date/time
- Linux OS does not generally track installation date/time
- Create time of
/lost+foundis good proxy for system install - Timestamps on SSH host keys typically indicates first boot
- Key files are
/etc/ssh/ssh_host_*_key
- Key files are
Default time zone
- System logs written in default time zone for machine
/etc/localtimestores default time zone data- Binary file format:
- Use
zdumpon Linux strings -a /etc/localtimeoften works- Look for matching file under
/usr/share/zoneinfo
- Use
- Local time zone
zdump /mnt/test/data/etc/localtime
Post-exploitation goals
Back doors
- Custom malware installs
- New or replacement binaries
- Web shells
- Account modification
- New (admin) accounts added
sort -t : -k 3 -n /etc/passwdwill sort password files and easy to see UID 0 accounts
- Application role accounts unlocked (
www,mysql) - Enhanced
sudoaccess privileges $HOME/.ssh/authorized_keysentries added- when you want to allow a remote system (or user) to log in via SSH without a password, using public key authentication
- New (admin) accounts added
- Custom malware installs
Persistent malware
- Service start-up scripts
/etc/systemd/system(systemd)/usr/lib/systemd/system
/etc/init*(traditional and Upstart)
- Scheduled tasks
/etc/cron*/var/spool/cron/crontabs/var/spool/cron/atjobs
- Service start-up scripts
How to find recent modifications
find /mnt/test/data –newermt '2023-07-24 00:00:00'- Display files modified after a certain timestamp or after compromise
find /mnt/test/data -newer /mnt/test/data/etc/passwd- Display files modified after target file
find /mnt/test/data –mtime -7- Find files modified in the last week
ls –lArt /mnt/test/data/etc- Directory listing sorted by mtime, oldest first
Timeline analysis
Standard timestamps
- Last modified time (M)
- Last time the file contents were changed
- Last access time (A)
- Last time the file was viewed/executed*
- With
relatime, Linux updates atime only:- if it’s older than mtime/ctime or
- More than 24 hours have passed
- Metadata change time (C)
- Last inode update (chown, chmod, …)
- Creation time (B)
- Date/time of file creation (EXT4 only)
inode
- A data structure that stores a file’s metadata (size, ownership, permissions, and data block pointers) but not its name.
- In contrast, Windows uses MFT (Master File Table) entries in NTFS, which store both metadata and the filename together.
- Date/time of file creation (EXT4 only)
Timeline caveats
- Timestamps are ephemeral:
- You only get the last modified time, change time, etc
- Normal system usage will update timestamps
- Admin users may change timestamps at will:
touchcommand allows root to set the atime or mtime to any time desireddebugfsgives the ability to update any timestamp Episode #80: Time Bandits
- Analyst needs understanding of typical system behaviors
- Timelines are a guide to evidence, not evidence themselves
How to create the timeline
There is a multi-step process for creating the timeline:
- Collect raw data into a body file
- Create chronological output (usually as CSV)
- Jump to key pivot points for analysis
Let’s go through each step one by one.
Collect raw data into a body file
- Body files are generated using the Sleuth Kit (TSK) tool
flsinmactimeformat. - TSK doesn’t understand Linux LVM, so we must first associate the logical volumes with disk devices that
flscan read.
$ fls -r -m / /dev/mapper/VulnOSv2--vg-root | gzip >bodyfile-root.gz $ fls - o 2048 -r -m /boot /mnt/test/img/ewf1 | gzip >bodyfile-boot.gz- Body files are generated using the Sleuth Kit (TSK) tool
Create chronological output (usually as CSV)
Use the
mactimecommand to create timeline.$ zcat bodyfile-* | mactime -d -y -p /mnt/test/data/etc/passwd -g /mnt/test/data/etc/group 2019-10-01 > timeline.csv- Using
zcatto uncompress the body files I made in theprevious step. -d= produce delimited (CSV) output-y= ISO 8601 date output in UTC (2019-10-05T11:31:37Z)-p,-g= Specify location of passwd/group files to see names not UIDs and GIDs2019-10-01 > timeline.csv= Build timeline from this date onwards > Save output to file
- Using
Jump to key pivot points for analysis
- Questions to answer:
- How/when did the attacker breach the system?
- How/when did they gain root access?
- What are you looking for?
- Suspicious file/directory creation or modification
- Evidence of program installation and/or execution
- Use your pivot points to begin your analysis
Sorry to repeat, but this is just a personal memo about something I found important. If you’re starting to learn Linux forensics, please refer to the content above! I will write another post about it, and that will be the last one.
Thanks for reading—see you in the next post! ( ˙꒳˙ )ノ゙